In Windows PowerShell, customizing your shell prompt can enhance your development environment by providing valuable information at a glance. This guide walks you through configuring Windows PowerShell to display a customized prompt with the username, date, and current folder name.
Text Encryption Tool Interface
Checking for Existing Profile
STEP 1: Check for an Existing Profile
Run the following command to check if you have an existing profile set up in PowerShell:
test-path $profileSTEP 2: Create a New Profile (if needed)
If the result is false, create a new profile:
new-item -path $profile -itemtype file -forceSTEP 3: Open the Profile in Notepad
Open the profile for editing:
notepad $profileSTEP 4: Add a Basic Prompt Function
Paste the following function to display the current folder name as the prompt:
function prompt {
  $p = Split-Path -leaf -path (Get-Location)
  "$p> "
}
Text Encryption Tool Interface
STEP 5: Save and Reload PowerShell
Save the file. If you encounter a script execution warning, run the following command:
Set-ExecutionPolicy RemoteSigned -Scope CurrentUserReload PowerShell or Visual Studio Code.
Examples for Terminal Short Paths
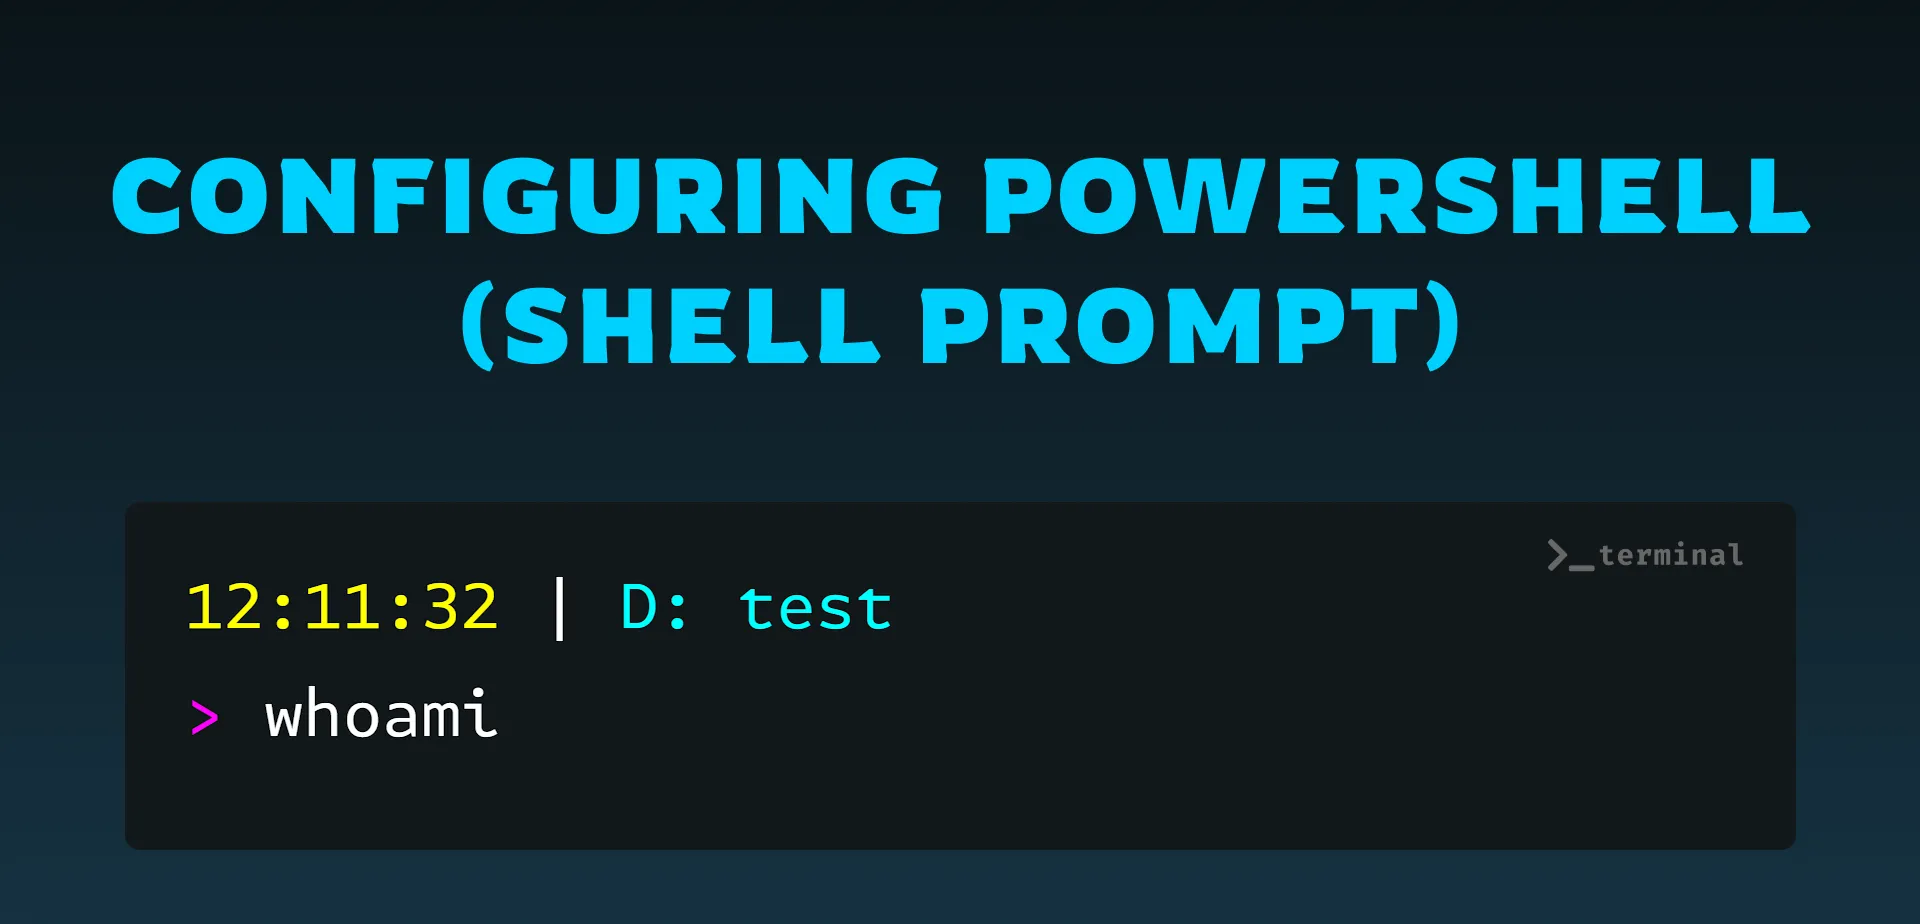
Example 1: Prompt with > and Date
function prompt {
  $time = Get-Date -Format "HH:mm:ss"
  $location = "$($time | ForEach-Object { Write-Host $_ -NoNewline -ForegroundColor DarkYellow }) $(" | " | ForEach-Object { Write-Host $_ -NoNewline -ForegroundColor Gray }) $($((Get-Location).Drive.Name + ": " + $(Get-Item $pwd).Name) | ForEach-Object { Write-Host $_  -ForegroundColor Cyan }) $(">" | ForEach-Object { Write-Host $_ -NoNewline -ForegroundColor Magenta })"
  return " "
}
Example 2: Prompt with $ and Date
function prompt {
  $time = Get-Date -Format "HH:mm:ss"
  $location = "$($time | ForEach-Object { Write-Host $_ -NoNewline -ForegroundColor DarkYellow }) $(" | " | ForEach-Object { Write-Host $_ -NoNewline -ForegroundColor Gray }) $($((Get-Location).Drive.Name + ": " + $(Get-Item $pwd).Name) | ForEach-Object { Write-Host $_  -ForegroundColor Cyan }) $("$" | ForEach-Object { Write-Host $_ -NoNewline -ForegroundColor Magenta })"
  return " "
}
Example 3: Prompt with > and username@SYSTEM
function prompt {
  $username = $env:USERNAME.ToLower()
  $deviceName = $env:COMPUTERNAME
  $location = "$($username | ForEach-Object { Write-Host $_ -NoNewline -ForegroundColor DarkYellow }) $("@" | ForEach-Object { Write-Host $_ -NoNewline -ForegroundColor Gray }) $($deviceName | ForEach-Object { Write-Host $_ -NoNewline -ForegroundColor DarkYellow }) $(" | " | ForEach-Object { Write-Host $_ -NoNewline -ForegroundColor Gray }) $($((Get-Location).Drive.Name + ": " + $(Get-Item $pwd).Name) | ForEach-Object { Write-Host $_  -ForegroundColor Cyan }) $(">" | ForEach-Object { Write-Host $_ -NoNewline -ForegroundColor Magenta })"
  return " "
}
Example 4: Prompt with >, username@SYSTEM, and Date
function prompt {
  $username = $env:USERNAME.ToLower()
  $deviceName = $env:COMPUTERNAME
  $time = Get-Date -Format "HH:mm:ss"
  $location = "$($username | ForEach-Object { Write-Host $_ -NoNewline -ForegroundColor DarkYellow }) $("@" | ForEach-Object { Write-Host $_ -NoNewline -ForegroundColor Gray }) $($deviceName | ForEach-Object { Write-Host $_ -NoNewline -ForegroundColor DarkYellow }) $(" | " | ForEach-Object { Write-Host $_ -NoNewline -ForegroundColor Gray }) $($((Get-Location).Drive.Name + ": " + $(Get-Item $pwd).Name) | ForEach-Object { Write-Host $_ -ForegroundColor Cyan }) $(">" | ForEach-Object { Write-Host $_ -NoNewline -ForegroundColor Magenta })"
  return " "
}
Text Encryption Tool Interface
Example 5: Prompt with >, username, and Full Date-Time
function prompt {
  $username = "herogautam"
  $time = Get-Date -Format "dd-MM-yyyy HH:mm:ss"
  $location = "$($username | ForEach-Object { Write-Host $_ -NoNewline -ForegroundColor Magenta }) $(" |" | ForEach-Object { Write-Host $_ $time -NoNewline -ForegroundColor DarkYellow }) $(" | " | ForEach-Object { Write-Host $_ -NoNewline -ForegroundColor Gray }) $($((Get-Location).Drive.Name + ": " + $(Get-Item $pwd).Name) | ForEach-Object { Write-Host $_ -ForegroundColor Cyan }) $(">" | ForEach-Object { Write-Host $_ -NoNewline -ForegroundColor Magenta })"
  return " "
}
Example 6: Prompt with >, username, Date, and Current Directory
function Prompt1 {
  write-host "PS " -ForegroundColor Magenta -NoNewline
  write-host (get-date -Format "dd-MM-yyyy HH:mm:ss") -ForegroundColor Yellow -NoNewline
  write-host " | " -ForegroundColor DarkGray -NoNewline
  write-host "\\$env:COMPUTERNAME " -ForegroundColor Gray -NoNewline
  write-host " | " -ForegroundColor DarkGray -NoNewline
  if ((Get-Location).Drive -ne $null) {
    write-host (Get-Location) -ForegroundColor Cyan
  } else {
    write-host (Get-Location).Path -ForegroundColor Cyan
  }
  write-host ">" -ForegroundColor Magenta -NoNewline
  return " "
}const [age, setAge] = useState(50);
const [name, setName] = useState("Taylor");// Using 'typeof' to infer types
const person = { name: "Alice", age: 30 };
type PersonType = typeof person; // { name: string; age: number }
// 'satisfies' to ensure a type matches but allows more specific types
type Animal = { name: string };
const dog = { name: "Buddy", breed: "Golden Retriever" } satisfies Animal;
// Generics with 'extends' and default values
function identity<T extends number | string = string>(arg: T): T {
return arg;
}
let str = identity(); // Default type is string
let num = identity(42); // T inferred as number
// 'extends' with interface and class
interface HasLength {
length: number;
}
function logLength<T extends HasLength = string>(arg: T): void {
console.log(arg.length);
}
logLength("Hello"); // OK: string has length (default is string)
logLength([1, 2, 3]); // OK: array has length
// logLength(123); // Error: number doesn't have length
// 'typeof' with functions
function add(x: number, y: number): number {
return x + y;
} / sdf
Text Encryption Tool Interface
PowerShell Colors Reference
| Color | HTML Code |
|---|---|
| Dark Cyan | #00cdcd |
| Dark Red | #cd0000 |
| Magenta | #ff00ff |
| Blue | #5c5cff |
| Dark Gray | #7f7f7f |
| Dark Yellow | #cdcd00 |
| Red | #ff0000 |
| Cyan | #00ffff |
| Dark Green | #00cd00 |
| Gray | #e5e5e5 |
| White | #ffffff |
| Dark Blue | #6495ed |
| Dark Magenta | #cd00cd |
| Green | #00ff00 |
| Yellow | #ffff00 |
Next.js (Pages Router) and Contentlayer Setup
Next.js (Pages Router) and Contentlayer Setup
Configuring PowerShell (shell prompt)